

Managing Persistent Volumes in Your Deployment 💥

👨💻 DevOps Architect @ Hippo Technik, LLC Passionate about bridging the gap between development and operations, I'm a dedicated DevOps Engineer at 6D Technology. With a strong belief in the power of automation, continuous integration, and continuous delivery, I thrive in optimizing software development pipelines for efficiency and reliability. 🚀 Exploring the DevOps Universe In my articles, I delve into the fascinating world of DevOps, where I share insights, best practices, and real-world experiences. From containerization and orchestration to CI/CD pipelines and infrastructure as code, I'm here to demystify the complex and empower fellow developers and ops enthusiasts. 📝 Blogging for Knowledge Sharing As a tech enthusiast and a lifelong learner, I'm committed to sharing knowledge. My articles aim to simplify complex concepts and provide practical tips that help teams and individuals streamline their software delivery processes. 🌐 Connect with Me Let's connect and explore the ever-evolving landscape of DevOps together. Feel free to reach out, comment, or share your thoughts on my articles. Together, we can foster a culture of collaboration and innovation in the DevOps community. 🔗 Social Links LinkedIn: https://www.linkedin.com/in/unnati-gupta-%F0%9F%87%AE%F0%9F%87%B3-a62563183/ GitHub: https://github.com/DevUnnati 📩 Contact Have questions or looking to collaborate? You can reach me at unnatigupta527@gmail.com Happy Learning!!
#90daysdevopsChallenge
#day36
Configuration_files : https://github.com/DevUnnati/90daysdevopschallenge
What is PV in Kubernetes?
PV stands for Persistent Volume which means it's always available, It is a cluster-wide resource or object, used to store data in a way that persists beyond the lifetime of the Pod.
K8S provides API for users and administrators to manage and consume storage to manage the volume, it uses the persistent volume API resource type and to consume it uses the persistent volume claim API resource type.
Why do we use the Persistent Volume Concept in Kubernetes?
Before using this concept, our data was always stored inside a pod in emptydir but when our pod went down or a new pod was created, we lost our data and got a new emptydir which was empty.
To overcome this problem, create storage on a host like a worker node and mount the volume to the pod. but just imagine if we have multiple worker nodes and our pod goes down, there is no guarantee when the pod comes up again it will go to the same worker node and connect to the volume.
finally to overcome all these problems we use the concept of persistent volume, where we create storage outside the nodes and connect all the nodes or pods with one storage. In this case, there is no problem if our pod or node goes down. We never lose our data which is stored in outside volume.
What is a Persistent Volume Claim?
Persistent Volume Claim is an object in K8S. To use PV you need to claim it first, called PVC.
The PVC requests to the PV with your desired specification (access mode, size) from K8S. Once a suitable persistent volume is found. It is bound to the Persistent Volume Claim.
After a successful bound to a PV, you can mount it as a volume in a pod.
Commands for PV
a) List Persistent Volume:
kubectl get pv
b) Describe a Persistent Volume
kubectl describe pv <pv-name>
c) Delete a Persistent Volume
kubectl delete pv <pv-name>
Commands for PVC
a) List Persistent Volume Claim:
kubectl get pvc
b) Describe a Persistent Volume Claim:
kubectl describe pvc <pvc-name>
c) Delete a Persistent Volume Claim:
kubectl delete pvc <pvc-name>
d) Edit a Persistent Volume Claim:
kubectl edit pvc <pvc-name>
❄Tasks:
Task 1:
Create a Persistent Volume using a file on your node. Create a Persistent Volume Claim that references the Persistent Volume. Update your deployment.yml file to include the Persistent Volume Claim. After Applying pv.yml pvc.yml your deployment file look like this. Apply the updated deployment using the command: kubectl apply -f deployment.yml.Verify that the Persistent Volume has been added to your Deployment by checking the status of the Pods and Persistent Volumes in your cluster.
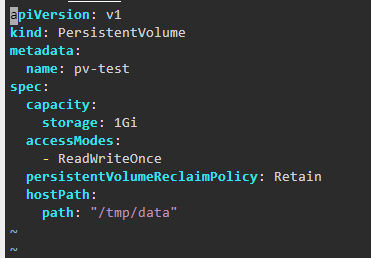
Step 1: Create pv.yaml and apply that file. Verify PV is created successfully.

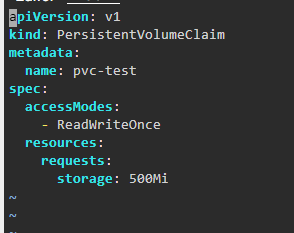
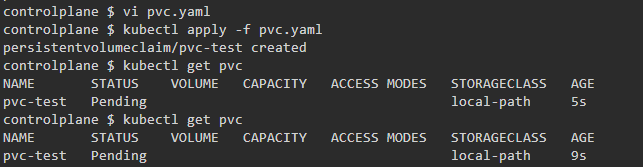
Step 2: Create pvc.yaml and apply that file. Verify PVC is created successfully.
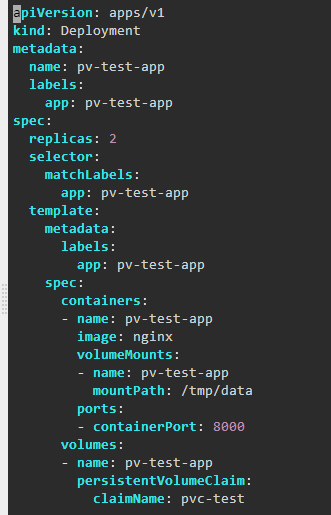
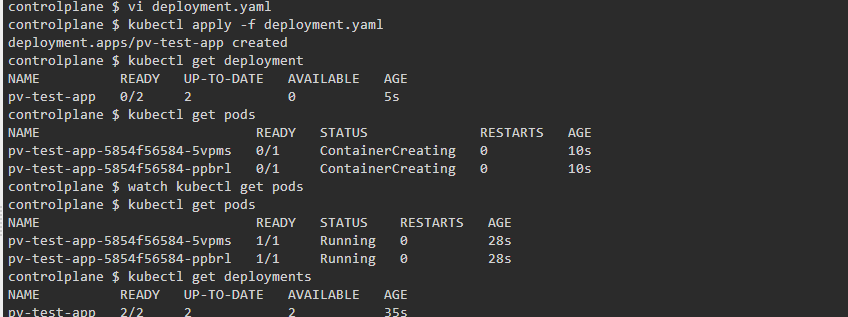
Step 3: Create Deployment.yaml and apply. Verify Deployment was created successfully.
Task 2:
Accessing data in the Persistent Volume, Connect to a Pod in your Deployment using the command: `kubectl exec -it -- /bin/bash. Verify that you can access the data stored in the Persistent Volume from within the Pod.
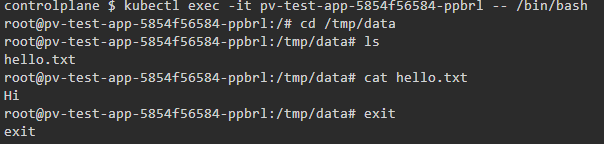
Step 1: Go inside the pod. and Verify whether storage exists or not.

Step 2: Now I create one file by using the echo command on /tmp/data (storage location).

Step 3: Now by using another pod go inside the pod and check whether the file exists or not.
In the Next Article, we will start the most demanding Cloud Platform AWS(Amazon Web Service)...
Thank you for giving your precious time to read this blog/article and if any suggestions or improvements are required on my blogs feel free to connect on LinkedIn Unnati Gupta. Happy Learning 💥🙌***!!!***


